Our previous attempt to 3D print a self starting siphon for making a Black and Tan exposed a fundamental lack of understanding of fluid dynamics. But we decided to give it another shot!
Design:
As in previous designs, the basic idea is to have a largish reservoir with a pipe leading down to the bottom of a beverage container beneath the reservoir. When a dense beverage is poured into the reservoir, the pipe siphons it to the bottom of the container displacing any less dense fluids in the container, resulting in a layered beverage.
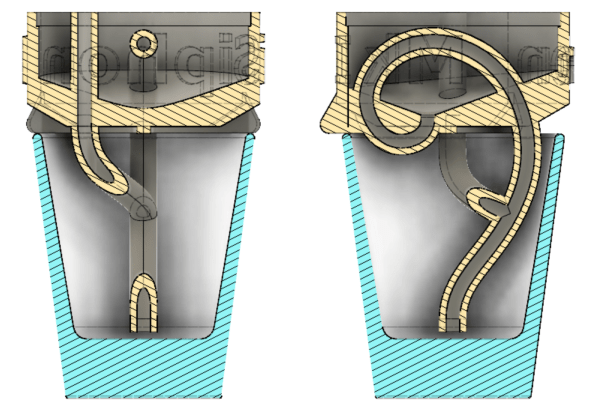
Cross sections showing the Mini Siphon Mk I sitting atop a shot glass. Perpendicular cross sectional planes were chosen to cut through venting pipe (left) and the spiral siphoning pipe (right).
The 3D model for the Mini Siphon Mk I is available on Thingiverse.
While testing the Mark II, it seemed to be the case that having a venting hole along the siphon pipe had two problems: 1) the hole was too small and air could not escape fast enough for a siphon to start, 2) the hole was too big and allowed air to leak back into the pipe stopping a working siphon. To address this paradoxical problem with venting holes, a venting pipe leading from the lower portion of the siphoning pipe back up through the reservoir was added. The venting pipe is the same diameter as the siphoning pipe, which will solve the problem of being too small. The venting pipe is attached to the siphoning pipe just above the expected fluid level after the first pour. Thus as soon as the fluid level raises above the branch, the denser fluid should move into the venting pipe preventing any air from leaking into siphoning pipe.
The reservoir has been updated with a floor that is sloped towards the siphon inlet, to improve drainage. Careful measurements were also taken to calibrate the reservoir, allowing for the addition of a fill line around the inner wall.
To save printing time and gain some experience with a finer printing process, this iteration has been scaled way down and is sized for making layered shots instead of pint sized Black and Tans.
Testing:
Like the previous attempts at 3D printing a self starting siphon, the Mini Siphon Mk I was printed on a LulzBot TAZ 6. However the previous version used a 1.2mm print head with PLA filament, this was printed using a 0.25mm print head with copolyester filament.
Between the use of copolyester (which is very pretty) and the tiny size of the print, the result ended up much more fragile than expected. On the first print, both pipe segments leaving the bottom of the reservoir snapped off. The venting pipe that leads through the reservoir also snapped off.
After careful surgery with some paraffin wax (involving a few mishaps), the Mini Siphon Mk I was ready for testing. The original plan was to recreate layered shot we known as an 1812 Overture, which is Vodka layered on top of Chambord. However our Chambord was quite old and tasted less of raspberry and more of raisins. So, we opted for Michigan Cherry Liqueur as a substitute.
Normally when layering vodka and a liqueur, one would add the denser liqueur first, then carefully, often over the back of a spoon, pour the less dense vodka on top. With the mini siphon however, 4 tsp. (2/3 fl. oz.) of vodka is added first. Then once that finished draining, 4 tsp. of liqueur was used to displace the vodka from the bottom up. Resulting in 1 1/3 fl. oz. instead of the usual 1.5 fl. oz for a shot, to leave room for the siphon and venting pipes.
As expected, the vodka easily started a siphon, which fully drained the reservoir. Then when the liqueur was added, it also was able to start a siphon and displace the vodka. The liqueur also moved into the lower section of the venting pipe, blocking any air that might break the siphon. The siphoning of the liqueur was also able to completely drain the reservoir of fluid. Then when the siphon was removed, the remaining fluid in the siphon pipe drained and quickly sank to the bottom, leaving two very distinct layers with clear vodka on the top and dark red cherry liqueur on the bottom. High fives all around!
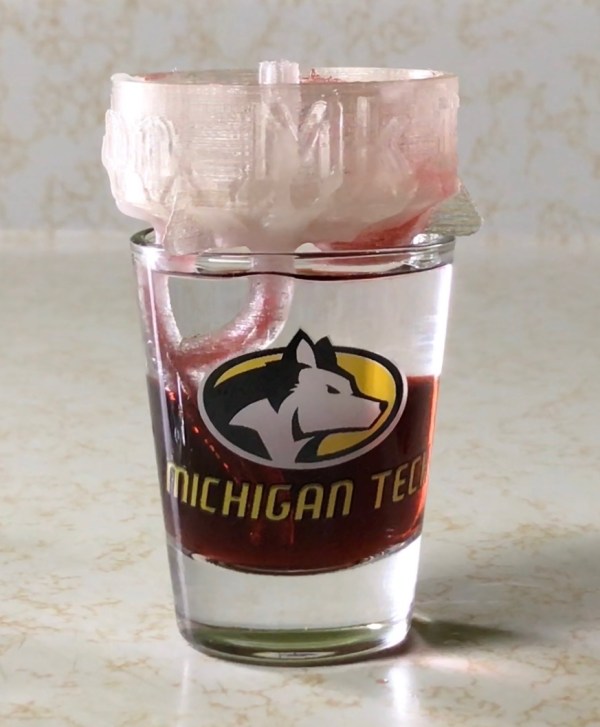
Layered shot of vodka (top) and cherry liqueur (bottom).
However, upon further testing (i.e, the trial for the angle showing the inside of the reservoir draining) the liqueur siphon failed to start. To correct the malfunction the bottom of the siphon pipe had to be pulled out of the vodka in order for siphoning to start. We suspect the problem is that the very narrow inner diameter of the venting pipe allowed the surface tension of residual fluids from a previous test to block the flow of air.
What went wrong:
- While removing support material several pieces broke off. The pipe segments below the reservoir snapped off, as did the vent pipe through the reservoir. The thinner section of reservoir above the fill line also snapped off.
- Additionally, due to the small size, using wax to repair the damage proved difficult.
- While reattaching the upper section the venting pipe, the inlet for the siphon pipe was blocked by wax.
- On one trial, the siphoning of the denser fluid failed, most likely due to liquid trapped in the venting pipe.
- Some minor leaking from the reservoir did occur.
What went right:
- Before trying to remove the support material, it had printed perfectly, even though it was apparently 4º off level during slicing.
- After accidentally blocking the siphon inlet with wax, filling the reservoir with 175ºF water and adding a bit of dish detergent (to decrease surface tension), the wax blockage cleared and water was able to siphon quite nicely.
- Even with the bits above the fill line missing, the remaining reservoir was sufficient to start a siphon.
- With the vent pipe attached, the reservoir fully drained once a siphon was started.
- Once all pipes were re-attached, the first few trials went perfectly.
Possible Improvements:
- The biggest flaw in this print was the fragility of the siphon and vent pipes. So, increasing the thickness around of those features where they meet the reservoir would certainly be needed.
- Support material could be reduced to minimize the chances of damage while removing it.
- The walls of the reservoir should be a bit thicker as there was some leaking and the bit above the fill line snapped off.
Conclusion:
This small scale version of the proposed beer siphon clearly demonstrates the feasibility of 3D printing a self starting siphon to produce a layered beverage by using a dense fluid to displace a less dense fluid.

Pingback: 3D Printing a Better Black and Tan Part 4: Revenge of The Supports | Doing Science To Stuff
Pingback: 3D Printing a Better Black and Tan Part 5: Too Fast, Too Furious | Doing Science To Stuff
Pingback: 3D Printing a Better Black and Tan Part 6: The Next Generation | Doing Science To Stuff