After the successful test of a miniature siphon for making layered shots, it was time to try a full sized siphon for making a Black and Tan. But will it work?
Design:
Overall, this is essentially the Mini Siphon Mk I scaled up to the size of the Siphon Mk II. As in previous attempts at 3D printing an auto starting siphon for making a Black and Tan, this design consists of a largish reservoir that sits atop a pint glass, with a siphon pipe that leads to the bottom of the pint glass.
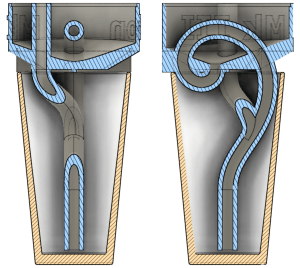
Cross sections showing the Beer Siphon Mk III sitting atop a pint glass.
The 3D model for the Beer Siphon Mk III is available on Thingiverse.
As in the Mini Siphon Mk I, this design incorporates a vent pipe that runs from the siphon pipe up through the reservoir to allow trapped air to escape.
In this updated design, the vent pipe has been altered slightly so it attaches to the siphon pipe at a different angle than in the Mini Siphon Mk I.
Testing:
Due to time constraints and limited access to the printer, this model could not be printed at the same resolution as the Mini Siphon Mk I. This model was printed on a LulzBot TAZ 6 using colorFabb nGen clear filament with a 1.2mm nozzle and 0.9mm layer height. Slicing was done using Cura Lulzbot Edition. To reduce printing time, the model was rotated 180º around the X axis, and to align support material with the siphon pipe, it was rotated 90º around the Z axis. Zig-zag supports touching build plate at 10% density were used. To avoid issues with the reservoir floor in previous printings, support roof was also enabled.
While delayed due to some printer malfunctions, the print went smoothly. Removing the support material, while tedious, also went fairly smoothly. That is until trying to remove the roof support for the siphon pipe. A slip of the tool being used snapped off the vent pipe where it meets the reservoir floor.
After many attempts to patch the vent pipe and reservoir floor with paraffin wax and a drinking straw, a test with colored water was performed. Room temperature blue water siphoned just fine, so red water cooled with an ice cube was tried. As shown below, this resulted in the distinct layers being formed, as expected, however the reservoir failed to fully drain.
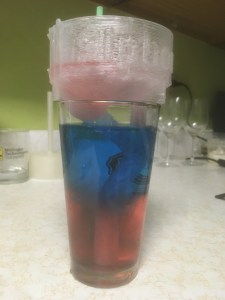
Room temperature water (blue) layered on top of cooler water (red). Some water failed to siphon out of the reservoir.
After this partially successful test, an attempt with beer was made. However, the first beer (Guinness) failed to finish siphoning.
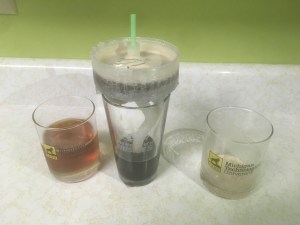
Failure of the less dense beer to finish siphoning lead to an aborted test.
After the partial success with water and failure with beer, additional repair attempts were made, but eventually it became clear that effort would be better spent improving the design and printing settings so that repair would not be needed.
What went wrong:
- While removing support material from the print, the vent pipe broke off right where it meets the reservoir floor.
- The support floor that supported the top of the siphon pipe was too difficult to remove.
- The reservoir floor was very leaky.
- While attempting to patch the vent pipe and reservoir floor with paraffin wax, some wax leaked into the vent pipe and siphon pipe leading to blockages.
What went right:
- The actual printing went smoothly and detached from the print plate without damage.
Possible Improvements:
- Print with a smaller nozzle and/or use a thinner layer height would probably reduce the amount of leaking.
- Increase the Wall Line Count to thicken shell walls so more layers overlap which should reduce leaking.
- Enable combing to reduce stringing that can reduce flow through the siphon and venting pipes.
- Move the vent pipe to be adjacent to either the reservoir wall or top part of the siphon pipe, so the wall or the siphon pipe can provide structural support.
- Change the support roof pattern to something other than concentric, so it might be easier to grab and remove.
- Increase the diameter of the siphon and vent pipes, to improve siphoning speed.
Conclusion:
In this iteration we attempted to verify that the vent pipe that was successfully tested in the Mini Siphon Mk I would work in a scaled up model for making a pint sized beverage. After several set backs, the partial success of one test leads us to conclude that the addition of the vent pipe does solve the trapped air problem observed in the Mk II. Future iterations will focus on fine tuning the printing process to minimize leakage and breakage.

Pingback: 3D Printing a Better Black and Tan Part 5: Too Fast, Too Furious | Doing Science To Stuff